石墨板材摩擦磨損試驗機廠家 適用范圍:
適用于塑料制品、橡膠制品、石墨板材或其他復合材料的滑動摩擦,磨損性能測試,也可對試驗中試樣的磨擦力、磨擦系數和磨損量進行測定。也可對試驗中試樣的磨擦力、磨擦系數和磨損量進行測定。
Graphite sheet friction and wear testing machineScope of application:
It is suitable for sliding friction, wear testing of plastic products, rubber products, graphite plate or other composite materials. It can also be used to measure the friction force, friction coefficient and wear amount of the test sample. The friction force, friction coefficient and wear volume of the specimens can also be measured.
Graphite sheet friction and wear testing machine特點:
1、速度精度:1%
2、負荷精度:0.5%
3、摩擦力矩精度:1%
4、具有試驗人員分級管理功能。
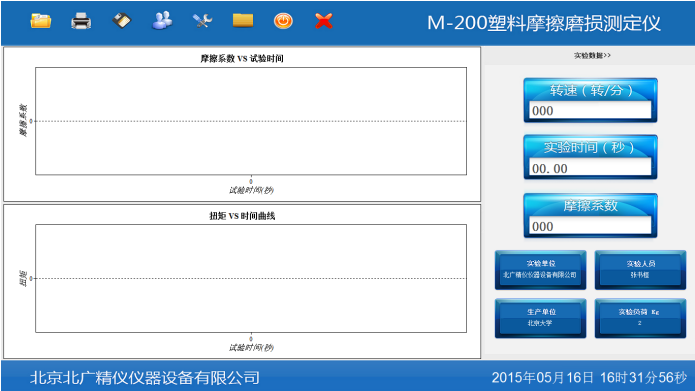
5、實時顯示摩擦系數-時間,扭矩-時間曲線。
6、試驗報告可打印試驗參數,試驗數據,曲線,備注等信息,簡單,方便,可編輯。
7、試樣尺寸: 30mm?7mm?6mm
8、轉動速度: 0-500轉/分 (可調)
9、負 荷: 196N ? 0.1%(可增至392N)
10、摩擦環尺寸:¢40?10mm ,倒角0.5?45?,外圓表面與內圓同心度偏差小于0.01
11、摩擦環材質:45號鋼,淬火,熱處理HRC40-45,外圓表面光潔度▼8
12、摩擦力矩: 0--4N?m
13、砝碼重量:4KG砝碼一件,1KG砝碼4件,可實現重量疊加功能。
14、計數器精度:1S
15、傳感器測量精度:1% FS
16、系統運行穩定,可靠性高。
17、結構緊湊,使用方便,簡單。
18、采用高精度電機、驅動機、傳感器,精度高。
19、主要配置及附件:(計算機控制)
1、試驗主機一臺
2、高精度扭矩傳感器一只
3、計算機數據采集卡一塊
4、計算機一臺(品牌)
5、彩色激光噴墨打印機一臺
6、計算機控制軟件一套
7、4Kg 砝碼兩件(備用一套)
8、標準磨擦環四件(備用兩件)
9、產品使用說明書一份
10、產品合格證
11、產品裝箱單一份
12、整機重量:約87 公斤
Graphite sheet friction and wear testing machine試驗設備
1、傳動系統,用來帶動圓環以給定的轉速旋轉,精確到5%以內,并要求圓環安裝部位軸的徑向跳動小于0.01毫米。
2、加載系統,對試樣和圓環,可施加法向力,精確到5%以內。
3、測定和記錄摩擦力矩系統,精確到5%以內。
4、記錄圓環轉數的計數器或記時器,精確到1%以內。
5、試樣夾具結構和尺寸見圖2,并附配墊圈 4 GB 848-76,沉頭螺釘M3?0.35長10毫米。要保證試樣安置后無軸向竄動。
注:試驗設備本標準推薦采用M-200型磨損試驗機。
6、本試驗中圓環的材質對塑料磨損試驗結果影響很大,因此本標準采用的圓環,其外形尺寸見圖3。
材料為45號鋼,圓環要求整體淬火,熱處理HRC 40~45,外圓表面光潔度▽8,倒角處均為0.5?45度,外圓表面與內圓同心度偏差小于0.01.
圓環可以反復使用,每次試驗后,需重新磨削。當外徑小于36毫米就不能再用。作仲裁試驗時必須用直徑40毫米的圓環。
注:圓環材質也可按產品標準另定。
test equipment
1. The transmission system is used to drive the ring to rotate at a given speed, accurate to within 5%, and requires the radial runout of the shaft at the installation location of the ring to be less than 0.01 millimeters.
2. Loading system, can apply normal force to the sample and ring, accurate to within 5%.
3. Measure and record the friction torque system with an accuracy of within 5%.
4. A counter or timer that records the number of revolutions of a circular ring, accurate to within 1%.
5. The structure and dimensions of the sample fixture are shown in Figure 2, and are equipped with washers 4 GB 848-76 and countersunk screws M3 ? 0.35, which are 10 millimeters long. Ensure that there is no axial movement after the sample is placed.
Note: This standard recommends using the M-200 wear testing machine for testing equipment.
6. The material of the circular ring in this experiment has a significant impact on the results of the plastic wear test. Therefore, the circular ring used in this standard has its external dimensions shown in Figure 3.
The material is 45 steel, and the circular ring requires overall quenching and heat treatment with HRC 40-45. The surface smoothness of the outer circle is ▽ 8, and the chamfers are all 0.5 ? 45 degrees. The concentricity deviation between the outer and inner circles is less than 0.01
The circular ring can be reused and needs to be re ground after each test. When the outer diameter is less than 36 millimeters, it cannot be used again. When conducting arbitration tests, a circular ring with a diameter of 40 millimeters must be used.
Note: The material of the circular ring can also be determined separately according to product standards.
試驗步驟
1、圓環應清除油污,貯存于干燥缸內以防生銹。
2、試樣經狀態調節后用感量為0.1毫克的分析天平稱取其質量(M1)。
3、把試樣裝進夾具,摩擦面用角尺校正并使它與圓環的交線外于試樣正中。裝好摩擦力矩記錄紙,開機校好零點。
4、再次用乙醇、丙酮等不與塑料起作用的溶劑仔細清除試樣和圓環上的油污,此后不準再用手接觸試樣和圓環的表面。
5、平穩地加荷至選定的負荷值。
6、對磨2小時后停機卸負荷,取下試樣和圓環,清理試樣表面后,用精度不低于0.02毫米的量具測量磨痕寬度,或在試驗環境下存放1小時后稱取試樣質量(m2)。
7、讀取摩擦力矩值。
Experimental steps
1. The circular ring should be cleaned of oil stains and stored in a drying cylinder to prevent rusting.
2. After adjusting the state of the sample, weigh its mass (M1) using an analytical balance with a sensitivity of 0.1 milligrams.
3. Insert the sample into the fixture, calibrate the friction surface with an angle ruler, and ensure that its intersection with the circular ring is outside the center of the sample. Install the friction torque recording paper and start the machine to calibrate the zero point.
4. Carefully remove the oil stains on the sample and the ring using solvents such as ethanol and acetone that do not work with plastic. After that, do not touch the surface of the sample and ring with your hands.
5. Smoothly load to the selected load value.
6. After grinding for 2 hours, stop the machine to unload the load, remove the sample and ring, clean the surface of the sample, measure the width of the grinding mark with a measuring tool with an accuracy of not less than 0.02 millimeters, or weigh the sample mass (m2) after storing it in the test environment for 1 hour.
7. Read the torque value of friction force.
試樣
塑料試樣尺寸
試樣尺寸見圖1.
試樣要求
試樣表面平整,無氣泡、裂紋、分層、明顯雜質和加工損傷等缺陷。每組試樣不少于3個。
試驗設備
1、傳動系統,用來帶動圓環以給定的轉速旋轉,精確到5%以內,并要求圓環安裝部位軸的徑向跳動小于0.01毫米。
2、加載系統,對試樣和圓環,可施加法向力,精確到5%以內。
3、測定和記錄摩擦力矩系統,精確到5%以內。
4、記錄圓環轉數的計數器或記時器,精確到1%以內。
5、試樣夾具結構和尺寸見圖2,并附配墊圈 4 GB 848-76,沉頭螺釘M3?0.35長10毫米。要保證試樣安置后無軸向竄動。
注:試驗設備本標準推薦采用M-200型磨損試驗機。
6、本試驗中圓環的材質對塑料磨損試驗結果影響很大,因此本標準采用的圓環,其外形尺寸見圖3。
材料為45號鋼,圓環要求整體淬火,熱處理HRC 40~45,外圓表面光潔度▽8,倒角處均為0.5?45度,外圓表面與內圓同心度偏差小于0.01.
圓環可以反復使用,每次試驗后,需重新磨削。當外徑小于36毫米就不能再用。作仲裁試驗時必須用直徑40毫米的圓環。
注:圓環材質也可按產品標準另定。
test equipment
1. The transmission system is used to drive the ring to rotate at a given speed, accurate to within 5%, and requires the radial runout of the shaft at the installation location of the ring to be less than 0.01 millimeters.
2. Loading system, can apply normal force to the sample and ring, accurate to within 5%.
3. Measure and record the friction torque system with an accuracy of within 5%.
4. A counter or timer that records the number of revolutions of a circular ring, accurate to within 1%.
5. The structure and dimensions of the sample fixture are shown in Figure 2, and are equipped with washers 4 GB 848-76 and countersunk screws M3 ? 0.35, which are 10 millimeters long. Ensure that there is no axial movement after the sample is placed.
業務咨詢:932174181 媒體合作:2279387437 24小時服務熱線:15136468001 盤古機械網 - 全面、科學的機械行業免費發布信息網站 Copyright 2017 PGJXO.COM 豫ICP備12019803號